You can find out how to create / copy an employee profile here: Create new employee profile
Depending on the licenses/functions used, the employee profile can contain various tabs that can be filled with a wide range of data as required.
Basic data #
The basic data is described in detail in the instructions Create new employee profile.
Extended properties #
If you have an active license for extended employee management, you can add extended properties (categories) for each employee profile. You can use these to activate properties that can be used to filter employees.

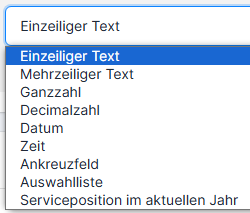
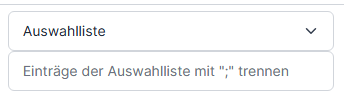
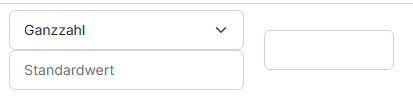
The properties are stored in the settings of the employee list. The property has a title and a description as well as a property that can be in various formats: Single-line text, selection list, date, checkbox, decimal number with unit, etc.
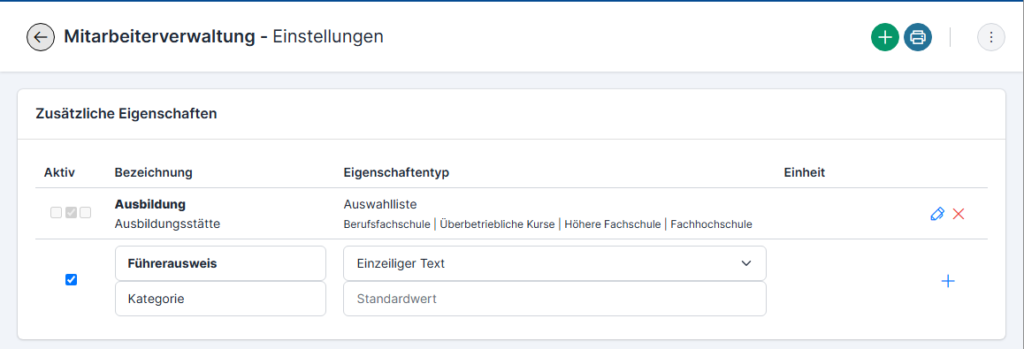
In general, the properties can be stored for 3 objects: Customer addresses, employee addresses, supplier addresses. The three checkboxes in front of the property correspond to these 3 objects. Depending on which checkbox is activated, the property appears in the respective property search of the object.
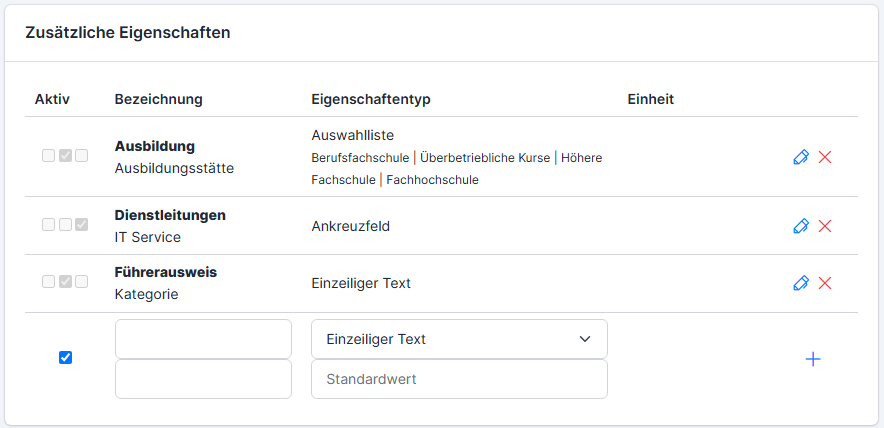
When the property is stored, the object category is set automatically, depending on which module was used to open the settings.
The property can contain a name (upper field – group name, lower field – name of the property), the type (can be supplemented with a default value or a selection list) and a unit for certain types (integer and decimal number).
Development #
Allocation to positions (staffing plan) #
Allocation to positions (staffing plan)
Training and further education and functions #
…
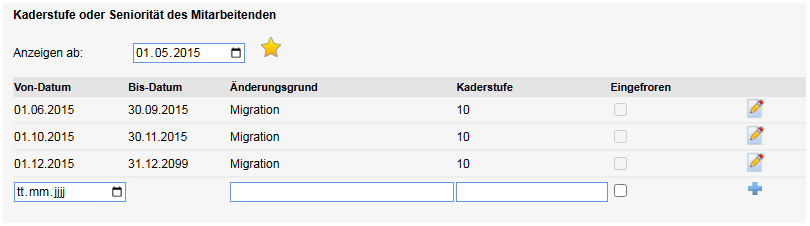
Management level or seniority of the employee #
Private data #
Private data #
In addition to the business data in the Basic data tab, the person’s private data can also be entered (such as private address, contact details, marital status, bank details, etc.). Private data is only required for payroll accounting.

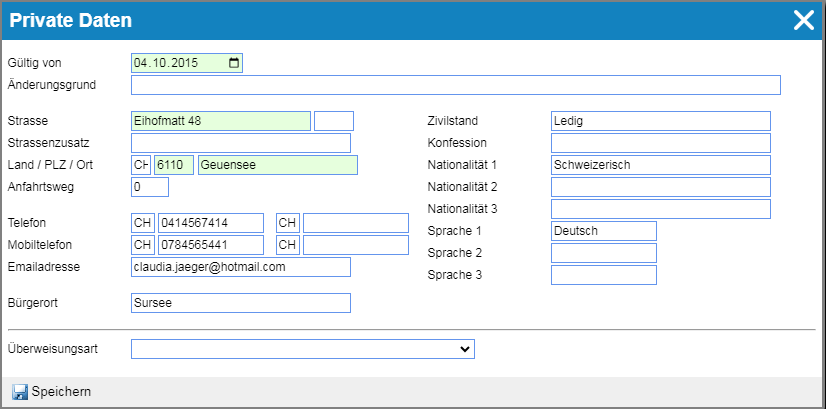
Employee relationships and emergency addresses #
For emergencies, you have the option of entering emergency addresses or legal guardians.

Authorizations #
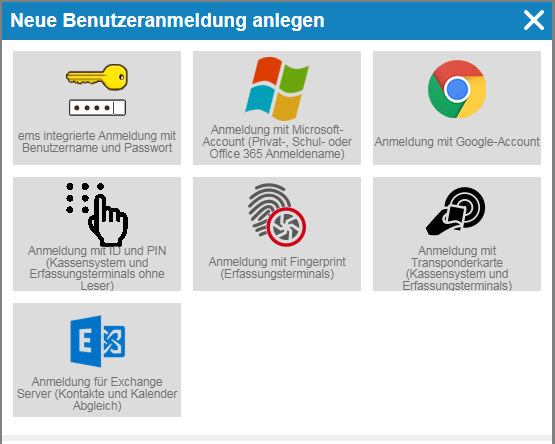
User name for logging in to the ems system #
If the employee is to enter data themselves, a login is required. To create a new login for the ems application, click on Plus. You can read more about authentications in the ems system here: Storing authentications in the ems system
You can find out how the authentications are stored on the terminal here: Datafox terminals and ems terminals (TT5, MT7)
The password generated by the system is visible under the user name. As soon as it is changed by the user, it becomes invisible/encrypted.

(1) ems integrated login with user name and password. By default, the e-mail address from the employee profile is used as the user name and a password is generated by the system. Both the user name and the password can be changed at any time.
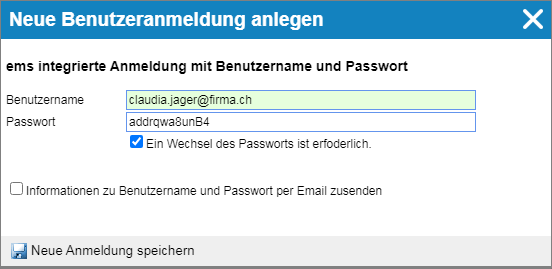
Activating the checkbox “A change of password is required” forces the user to reset the password when logging in for the first time.
Activating the “Send username and password information by email” checkbox enables the login data to be sent to the employee’s email address. This option is only possible if an e-mail address is stored in the employee’s profile. Otherwise, the e-mail address must be entered manually when activating it.
The user name of this type has the logon type “DATABASE” in the list of user names.

(2) Login with Microsoft account (private, school or Office 365 login name) – the e-mail address of the Microsoft account must be entered.

When authenticating via Microsoft, both company accounts (Azure AD), school accounts and Microsoft (formerly Live Account) can be used.
After successfully logging in from Microsoft, the user must give their consent once for the ems system to access their profile data. At the end, the user is automatically redirected back to the ems system.
(The use of Microsoft Login enables single sign-on with your company account).
The user name of this type has the logon type “MICROSOFT” in the list of user names.
(3) Login with Google account – the e-mail address of the Google account must be entered.

This enables authentication via Google. After successfully logging in to Google, the user is automatically redirected back to the ems system.
The user name of this type has the logon type “GOOGLE” in the list of user names.
(4) Login with ID and PIN (is used in the POS system and the registration terminals without reader) – the ems employee profile number must be entered. The password is generated automatically and can be changed.
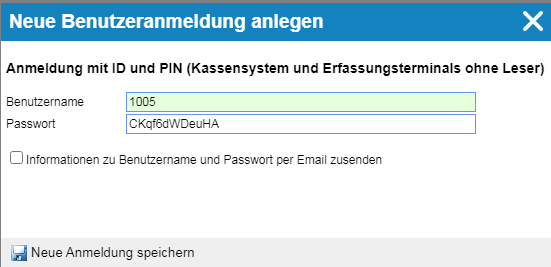
The user name of this type has the logon type “ID_PIN” in the list of user names.

(5) Login with fingerprint (used in registration terminals) – the ems user profile number is entered.
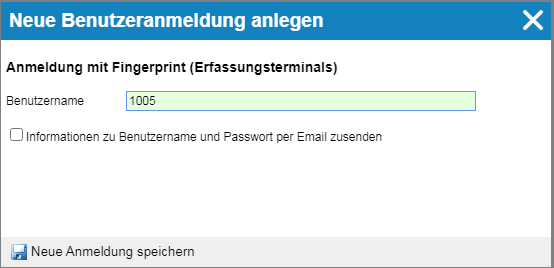
The user name of this type has the logon type “FINGER” in the list of user names.

(6) Login with transponder card (used in the POS system and the registration terminals) – the transponder card number is entered as the user name!
Enter the transponder number in the User name field (usually located on the back of the badge. If not available, hold the badge up to the terminal and read the error message containing the transponder number).
The user name of this type has the logon type “LEGIC” in the list of user names.

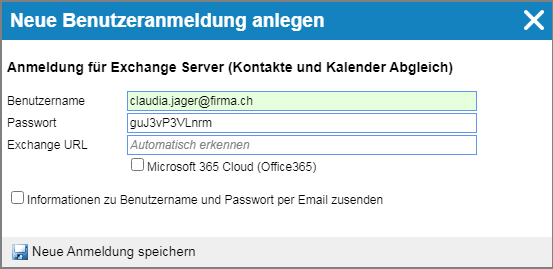
(7) Login for Exchange Server (contacts and calendar synchronization)
(8) Network login (IIS authentication to local AD) – DOMAIN (login name AS IN NETWORK!) – is current for the OnPremise users.
(9) EMS_CLIENT – Automatic stamping on the PC is carried out using ems Client, which must be installed on the employee’s PC.
Assignment of authorization roles #
Every employee requires authorizations, regardless of whether they have their own login or another employee collects data from this employee. The authorizations are grouped into roles and assigned to the employee below.
Find out more about setting up and managing authorizations here: Authorizations (General)
Access data for supplier portals and websites #
Depending on the configuration, this access data is used to log in to supplier orders.
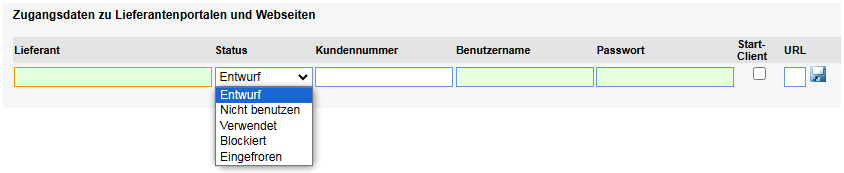
The supplier is found by entering the first few letters of the supplier addresses stored in the system. Among other things, the customer number can also be specified in case this is required when ordering. The status (Used, Frozen, etc.) can be set for each receipt data record.
Time recording #
Recording profile and shift plan for time recording #
Recording profiles and shift schedules (target hourly schedules) are used to record times. For hourly wage earners and external personnel, leave the shift plan field blank.
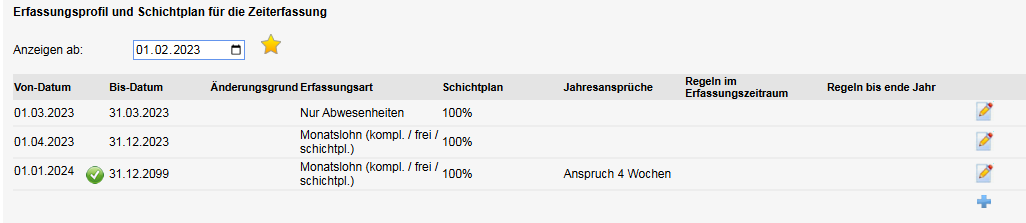
After pressing Plus, the dialog box for setting the time recording appears:

- Valid from – for entry, the date must be the same as the date of involvement in the organization, not before!!!
- Reason for change – entry, shift plan change, workload change
- Recording type: Monthly wage / hourly wage / external personnel
- simple – a simplified recording (only hours, without the start and end time) (e.g. 3.5 hours)
- Complete – complete recording with start and end time or recording of half or full days (e.g. 8.30 – 16.15)
- Stamping – the employee cannot change the start and end times
- free – the employee can change the start and end times
- geo – Always request recording with location data (geo-location) (ems Mobile only)
- Shift plan: the data entered is compared with a shift plan (target work schedule).
- Shift plan (e.g. 100% shift plan, 40% shift plan or “absences only” (recording working hours is possible, but not mandatory) – read here how to create and manage shift plans: Target hours (shift schedules / public holidays)
- Entitlements – Automatic vacation entitlements (e.g. annual vacation entitlements – read more here: Time credits (vacation, flexitime))
- Rules – Special rules (e.g. break regulations, company vacations, etc.) – these are created by the developer
Active data collection period #
The active recording period is currently being used. In ems Mobile, data can be entered for a maximum of 5 months after the entry period, after which the system blocks the entry.

The release dates for the employee (MA), the project manager (PL) and the supervisor (PL) are set automatically according to the templates for the recording periods(Time recording → Settings → Recording periods). These templates are stored when the system is set up.
Appointment MA – Date for the employee to set the visa (if the notification is activated, the employee receives a reminder e-mail on this day that he must release his time recording).
Appointment PL – Date for visa setting by the project manager (if the notification is activated, the project manager receives a reminder e-mail on this day that he must check and approve this time recording). The interim check by the project manager is common in larger companies if the supervisor is not able to check all reports independently. The PL appointment is missing if there is no project manager above this person.
Appointment VG – Appointment for visa setting by the supervisor (if the notification is activated, the supervisor receives a reminder e-mail on this day that he must check and approve this time recording). The exclamation mark in the yellow triangle indicates that the date for setting the visa is overdue.
Time from/to, expenses from/to – define the immediate entry period in which data is entered and released. After release, the system automatically switches to the next data entry period from the stored templates. If the period has already been released, the changes in this period are only possible if the release is withdrawn. (More about this: Withdrawing a visa)
To change the recording period (so that certain changes can be made in the closed period), the active recording period is changed. To do this, click on the “pencil” symbol (1). The period to be changed is selected here (2). Finally, press “Save” (3).


Time balances (vacation credits, hours balance, etc.) #
Enter entitlements in the time balances. Entitlements can be both positive and negative. For example, if an employee’s level of employment is reduced, enter the negative entitlement in order to reduce the balance /this applies to inactive automatic entitlements/.
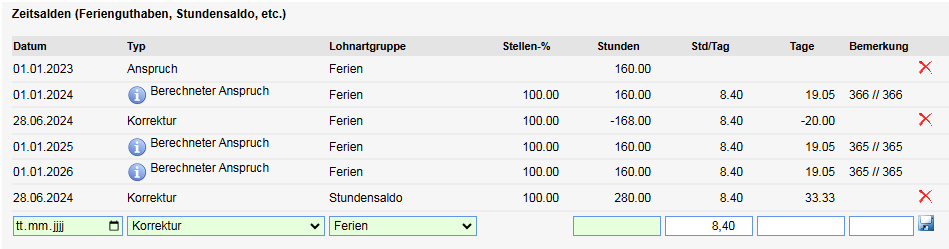
Calculated entitlement – If the calculated entitlement is activated in the data entry profile, the system automatically calculates the vacation entitlement from the date of activation. If you join or leave the company during the year, the system reduces the entitlement accordingly. You can read more about automatic entitlements here: Time credits (vacation, flexitime)
Corrections can be made via this window: e.g. negative/decreasing hourly balance correction when paying out overtime or positive/increasing vacation balance correction when reaching a certain age or in view of a company anniversary.
All balances are calculated in hours (and industry minutes). Conversion to days is only indicative and not binding!
Authorization for time recording for this employee #
This section reflects the authorizations in relation to this employee (who is allowed to do what in this employee’s time recording).
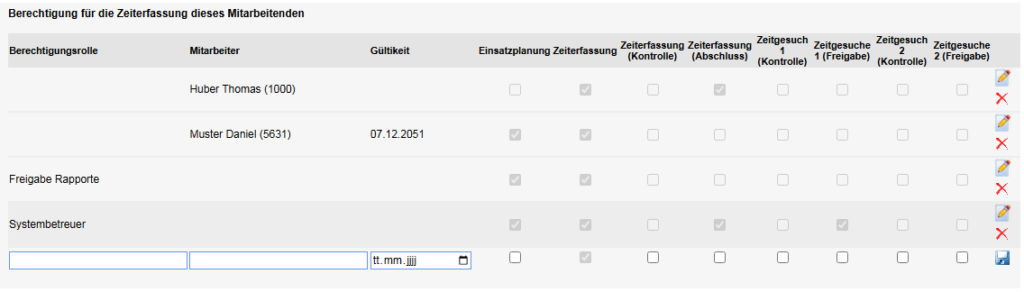
Authorization role – this duplicates the authorizations from the authorization roles of the same name.
Employee – personal authorization to manage the time recording of the “open” employee
Shift planning – who may schedule this employee in the shift planning.
Time recording – who may record the time for this employee.
Time recording (control) – as project manager, who is authorized to check this employee’s time recording report?
Time recording (completion) – who may complete/release this employee’s time recording report.
Time request (control) – who may control the time requests of this employee.
Time request (completion) – who may finally approve this employee’s time requests.
Time requests 1 / 2 – 2 groups of time requests can be differentiated. This is intended for users for whom certain time types may only be released by system administrators or HR officers (e.g. non-working accidents). The time types are assigned to group 1 or 2 in the authorization roles.
Payroll accounting #
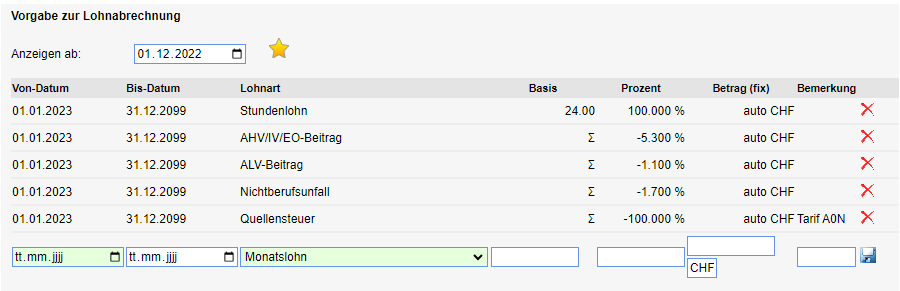
Specification for payroll accounting #
These settings are used for payroll accounting.
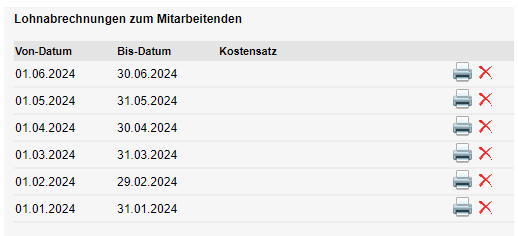
Pay slips for this employee #
All payslips are stored here.
Operating data #
Internal costs of the employee for the calculation of orders #
The employee’s internal costs are used for costing in orders. If the costs are higher or lower than the actual costs, this leads to a shortfall or surplus in the cost center.

You can find out how to create and manage allocation types here: Allocation types.
Operating resources #
Equipment assigned to the customer or of which the customer is the owner (vehicles, tools, telephones, etc.).

This enables the recording of operating resources on an order.
You can find out how to set up operating resources here: Equipment management
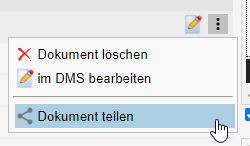
Documents #
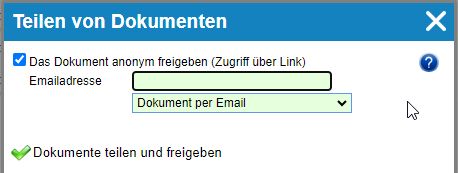
All files relating to the employee can be stored under Documents. These can be shared / sent directly from here.
To share, click on the three dots and select Share document.
In the next screen, check the box next to Share the document anonymously (access via link) and enter the e-mail address. Then click on Share and release documents.